Annoto is an add-on that can enhance the use of course videos in Blackboard for both instructors and students. Annoto’s optional features include detailed viewing analytics for instructors, as well as the addition of interactive tools that students can use while watching course videos.
To start using Annoto in your course, please reach out to the LeBow InTech Team. Once the Annoto add-on is enabled in your course, you can use this article as a guide for setting your feature preferences and accessing video analytics.
Accessing the Annoto Dashboard
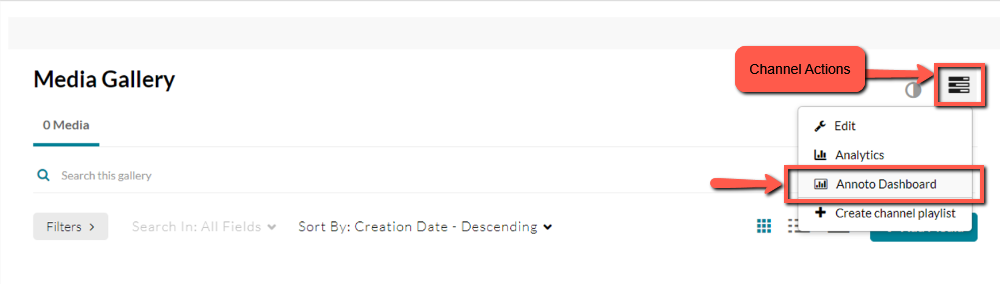
- Click on your Kaltura Media Gallery (instructor only) link. If you cannot find your Kaltura Media Gallery (instructor only) link, reach out to LeBow Instructional Tech for assistance.
- When the Media Gallery page loads, click on the Channel Actions icon at the top right. Then, select Annoto Dashboard from the pop-up menu.
- Your Annoto Dashboard is divided into three major areas: Hub, Insights, and Preferences. You will always begin at the Hub when you go to your Dashboard. However, when you are completing the initial setup of Annoto for your course, you should configure your Preferences first.
Setting Preferences
From your Annoto Dashboard, go to the Preferences section. This section contains the “on-off” switches for features that will be applied by default to all videos. You should plan to set your feature preferences before students start accessing videos in your course.
In the example image below, the Analytics features are all turned on, while Badges is turned off.
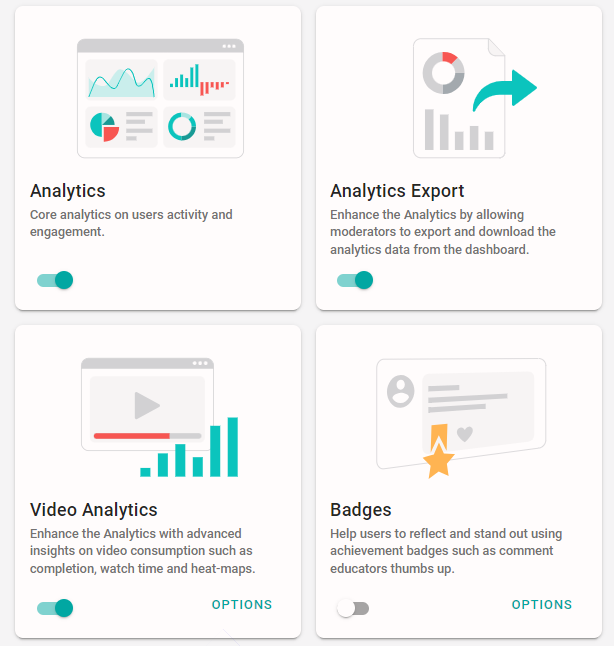
Below are more details about our recommended features, as well as a few others that might be of interest.
- Analytics, Video Analytics, and Analytics Export provide data on how students interact with course video content. Collecting this video data is one of the most powerful uses of Annoto, so we recommend enabling all three of these options as early as possible. If these options are enabled later on, the analytics will not include earlier video activity.
- Personal Notes allows students to type and save their own notes in a panel alongside each course video. Students can place notes at specific timestamps in the videos and save them to view and download later. Instructors can see how many notes have been added by each student, as well as general statistics on the use of Personal Notes in the entire course. The notes themselves, however, are only available to the student who wrote them (unless they intentionally download and share them with the instructor).
- Quizzes allow an instructor to build simple knowledge checks and incorporate them into video watching. Multiple choice and True/False questions can be added at specific timestamps in the video to help keep students engaged and to help with formative assessment. These quizzes should not be used for any high-stakes assessment purposes.
- If an instructor wishes to build more extensive interactions around video content, features such as Comments, Video Comments, Reactions, Chat, and Activity Feed are also available. Please reach out to LeBow Instructional Technology to discuss strategies for implementing these options.
This article in Drexel University’s Instructional Technology blog includes additional information about some student-facing features in Annoto.
After enabling the default features that you’d like to apply to all videos, you can enable and disable specific features for individual videos through the Hub.
Navigating the Hub
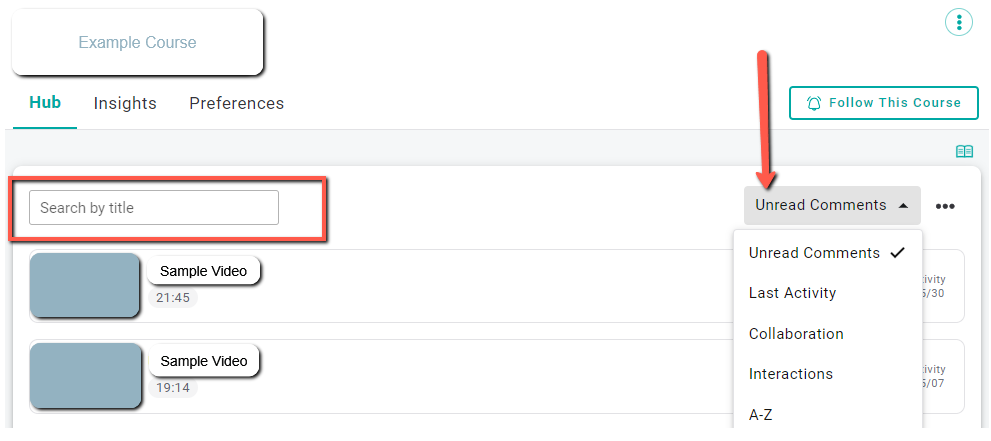
When you first open your Annoto Dashboard, you will always start at your Hub. The Hub shows a list of all videos that have been added to your course. From the Hub, you can set unique feature preferences and view data insights for individual videos.
- To find a video, you can start typing keywords from the title into the Search box. Alternatively, you can browse the full list of videos. When browsing the full list of videos, you can select your preferred sorting method by clicking on the default Unread Comments option to open the drop-down menu. Last Activity or A-Z will likely be the most useful sorting options for most users.
- Click directly on a video’s thumbnail to see more about that video. When you select a video, you will see Hub, Insights, and Preferences that are specific to that video. If you have enabled Quizzes for the video or the entire course, you may see an Assessments section here as well.
- Hub: shows basic information about the video, as well as any comments that have been posted.
- Insights: allows you to drill down and see video-specific data, such as a list of users who have accessed the video, types of interaction/participation that have been used, average watch time and completion rates, and trends in activity over time.
- Preferences: allows specific Annoto features to be enabled or disabled for this video without affecting the default options set for all course videos. For example, you may wish to allow comments on one video that asks students to share a reflection, while keeping comments closed on all of the regular lecture videos.
To move back up to the course-level Hub, you can click on the course’s name in the “breadcrumbs” just above the video’s title at the top left. You can also click on the 3-dot icon (located all the way at the top right) and click “Back to course view.”
Exploring Insights
The course-level Insights area allows an instructor to access a range of data to help them better understand how students are interacting with their course videos.
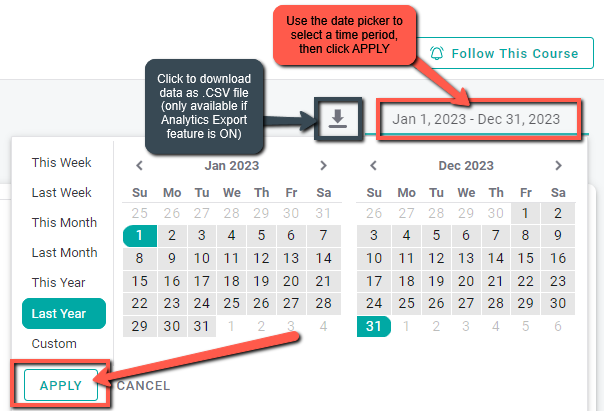
If you have enabled Analytics Export in your Preferences, you will also see a download icon located next to the date picker. Clicking this icon will allow you to download a .CSV (Excel) file containing the current Insights data.
The course-level Insights section is sub-divided into Overview, Videos, Users Activity, and Activity Trends.
- Overview shows how many users have been accessing your course videos, and how many of each type of interaction have taken place during the selected time period.
- Videos includes a list of all course videos added as Kaltura Media Items, with statistics on each video’s activity, average completion rate, numbers of users and views, and types of interactions that have taken place.
- Users Activity shows a list of the course users with similar statistics on their dates of activity, completion rates, video views, and types of interactions used.
- Activity Trends presents a graph showing the numbers and types of participation that have taken place during a selected time period. Within the larger graph, you can click and drag to highlight a smaller time period and view it in greater detail.
If you have any questions or would like assistance configuring Annoto for your course, please contact the LeBow Instructional Tech Services department at lebowintech@drexel.edu.